Underrated Ideas Of Info About How Do I Get A Commit From Branch

A Successful Git Branching Model »
Navigating the Git Galaxy
1. The Quest for a Specific Commit
So, you've found yourself in a situation where you need a specific commit from another branch. Maybe it's a bug fix, a feature enhancement, or just a piece of code that's too good to stay hidden away. Don't worry, it happens to the best of us! Git, thankfully, offers a few ways to accomplish this task, each with its own strengths and subtleties. Think of it like choosing the right tool from your toolbox for the job. We're not talking about quantum physics here, it's just a bit of code wrangling!
The keyword term we use for this article is "How do I get a commit from a branch". Let's break that down. Part of speech of keyword is verb, specifically an action verb as it involves performing an action to obtain a commit. This is crucial for this article as it defines the central action and focus. We will explore a number of methods to achieve this.
Before we dive into the "how," let's briefly touch upon "why." Why would you want to grab a single commit? Well, perhaps you're working on a feature branch and realize a fix from the `develop` branch is exactly what you need. Or maybe you're cherry-picking a hotfix to apply to a release branch. The possibilities are numerous. Recognizing these needs helps guide us to the best approach for retrieving a commit.
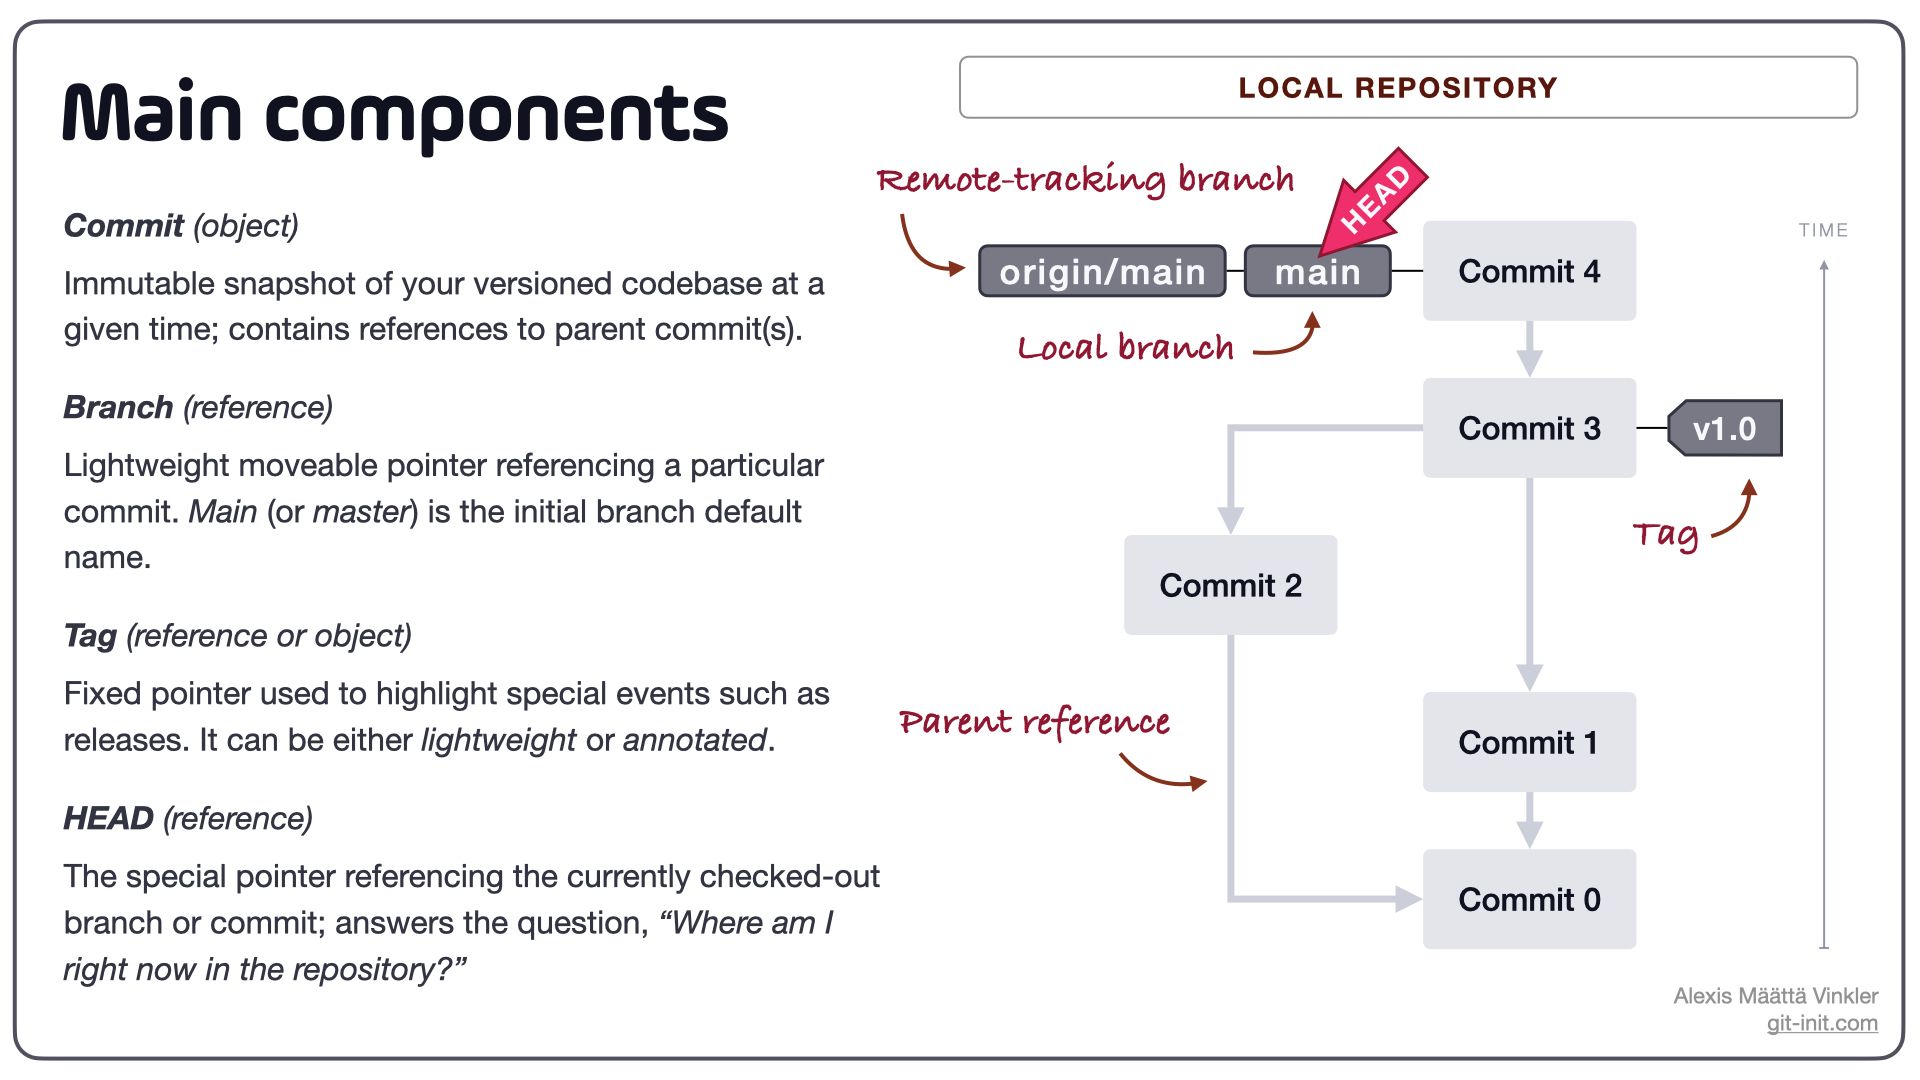
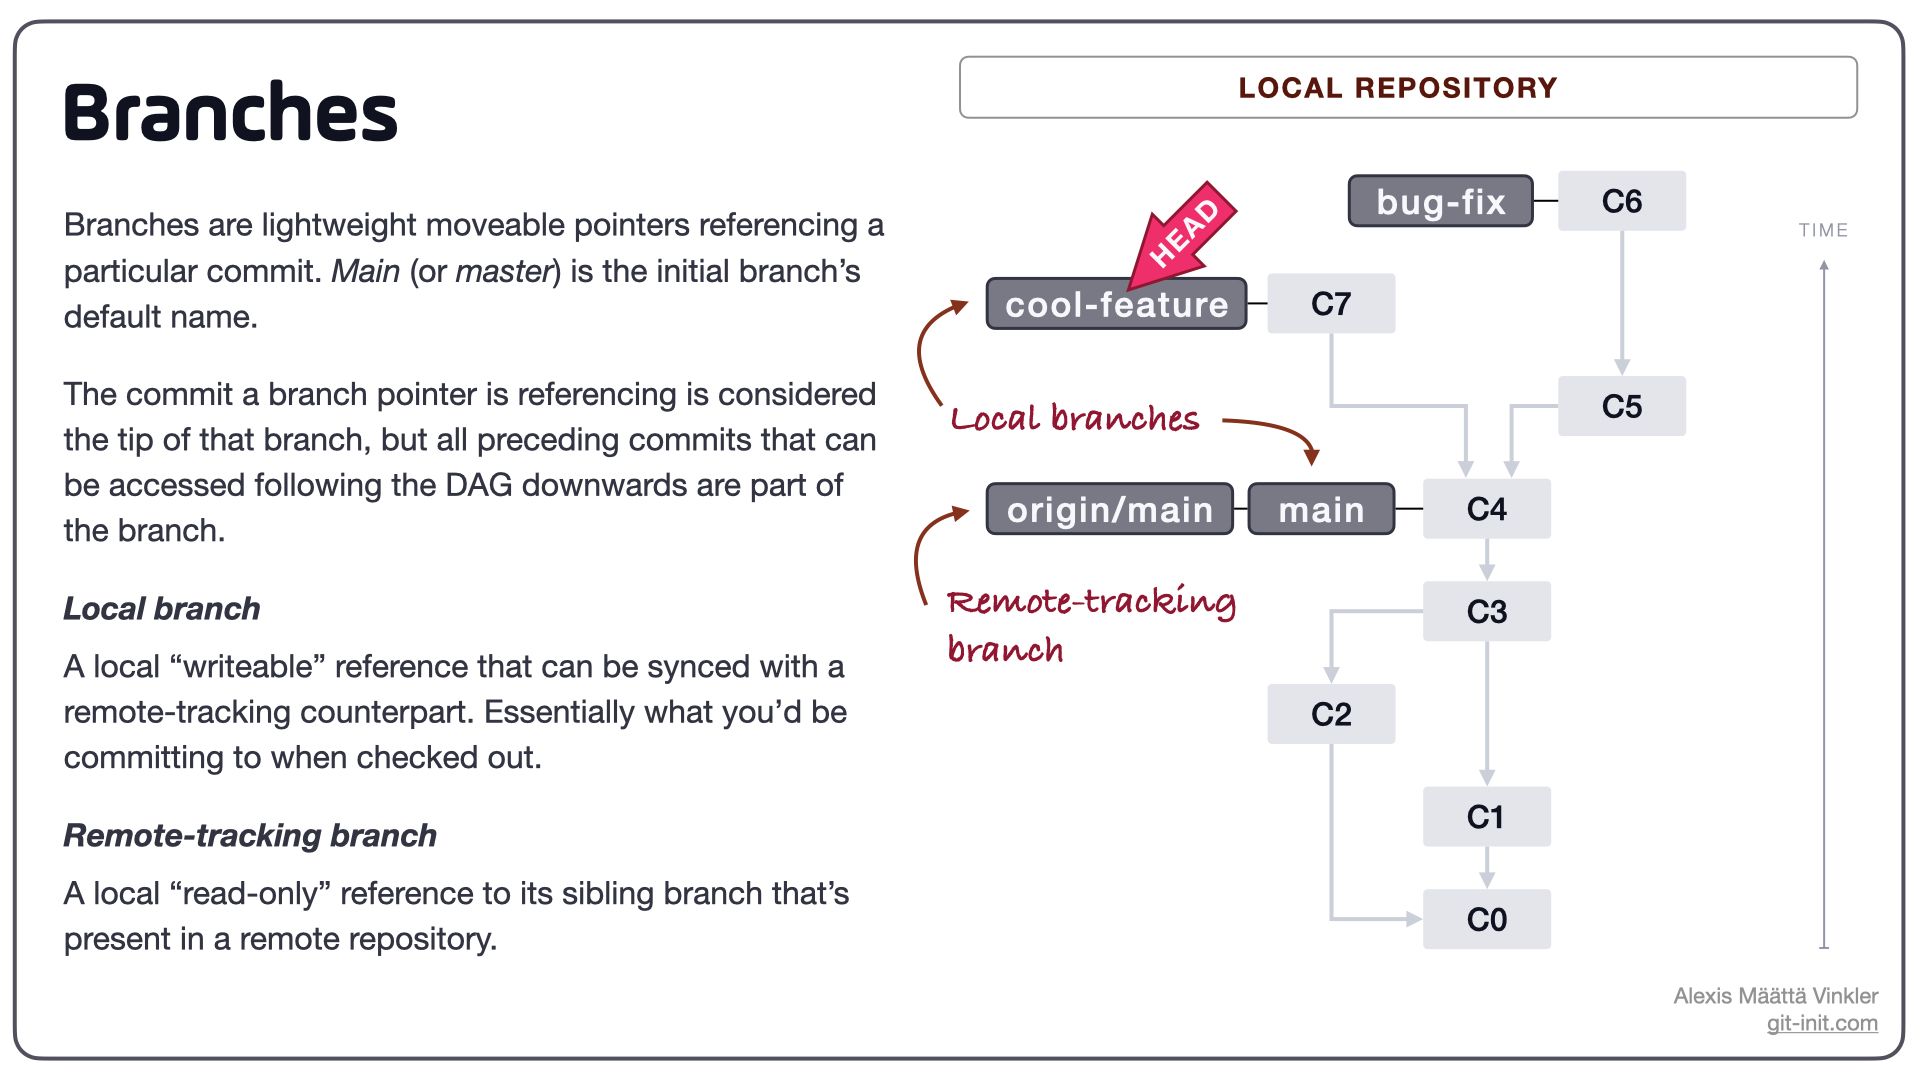
Understanding the basics of Git branches and commits is essential. Think of branches as parallel timelines of your project, each evolving independently. A commit, on the other hand, is a snapshot of your project at a particular point in time. Getting a commit from a branch is like reaching across timelines to borrow a piece of history. Now, let's get our hands dirty!
Method 1
2. Picking the Right Cherry (Commit, That Is)
Cherry-picking might sound like a delightful summer activity, but in the Git world, it refers to picking a specific commit from one branch and applying it to your current branch. It's like selecting the perfect, ripe cherry from a tree and adding it to your own basket. It's a targeted and precise way to incorporate changes.
The command is straightforward: `git cherry-pick `. Replace `` with the actual SHA-1 hash of the commit you want. You can find this hash by looking at the commit history of the other branch using `git log`. Be careful though! Cherry-picking is not without its quirks. You might encounter conflicts if the commit you're trying to apply introduces changes that clash with your current branch. Resolve these conflicts just like you would during a merge.
However, remember that cherry-picking creates a new commit on your current branch. It's not simply copying the old one. This new commit will have a different hash and will be part of your branch's history. The original commit remains untouched on its original branch. You're essentially duplicating the changes, not moving them. Think of it like photocopying a document rather than tearing it out of a book.
This approach is very useful when you only need very specific commit and not a range of commits. If you needed to take multiple commits then rebasing or merging might be a better fit. But when you are going for precision, cherry-picking is the way to go. It gives you fine-grained control over what gets included in your branch.
 Commits On Branches")
Method 2
3. The Art of Branch Integration
Sometimes, the commit you want is part of a larger set of changes on another branch. In such cases, merging might be a more suitable approach. Merging integrates the entire history of one branch into another. It's like combining two streams into a single, larger river. Although that may seem like overkill if you only want one commit, it depends on the relationship between the desired commit and the rest of the source branch.
The basic command is `git merge `. This command will attempt to merge the specified branch into your current branch. Git will try to automatically resolve any conflicts. If it encounters any, you'll need to resolve them manually. Remember to stage your changes after resolving conflicts and then commit the merge. Don't forget that step; it's like putting the lid on the mixing bowl after adding all the ingredients!
Now, if you only want the commit you need, you can revert the merge afterwards: `git revert -m 1 `. Here's the deal, this creates another commit, undoing the merge. If you are working by yourself, you can use `git reset --hard ` instead but be warned: This will remove all the changes on your branch after that commit so don't do it if you have commits to keep.
One way to think about this is that it's more suited to situations where the commit you want depends on other changes in the source branch. If it really depends on other changes you should probably merge. If you don't need to merge everything this approach should not be used, because the commit you want has to be independent to avoid conflicts with your branch.

Method 3
4. Reshaping Your Branch's Timeline
Rebasing is a more advanced technique that allows you to rewrite your branch's history by applying your commits on top of another branch. It's like transplanting your branch onto a new root. It's a powerful tool, but it should be used with caution, especially when working in a collaborative environment. Why the caution? Because rebasing rewrites history, which can cause headaches for others sharing your branch.
The command is `git rebase `. This will replay your current branch's commits on top of the specified branch. If you encounter conflicts, you'll need to resolve them just like during a merge. After resolving a conflict during a rebase, you need to use `git rebase --continue` to proceed with the rebase. If you want to abort, you can use `git rebase --abort` and you won't be changing the history if there's any conflicts.
If you only want to apply the specific commit that you want, then before you rebase you have to interactively tell git which commits to apply: `git rebase -i `. Change `pick` to `drop` on any commit you don't want to keep on your branch. When finished, the selected commits will be cherry-picked on your branch.
Rebasing is best used when you want a clean, linear history. It avoids merge commits, which can clutter up your project's history. However, remember the golden rule: Never rebase public branches! Rebasing a branch that others are working on can lead to a lot of confusion and frustration. If you're not sure whether to rebase or merge, err on the side of merging.
Method 4
5. Creating and Applying Patches
Creating a patch is like creating a recipe that describes the changes introduced by a commit. You can then apply this recipe to another branch. It's a useful technique when you want to share changes without directly interacting with Git repositories. Think of it like sending someone a detailed instruction manual on how to build a specific feature.
To create a patch, use the command `git format-patch ~1..`. This will generate a `.patch` file containing the changes introduced by the specified commit. The `~1` part refers to the commit before the one you want to patch. The `..` specifies that you want to include the changes up to and including the specified commit.
To apply a patch, use the command `git apply `. This will apply the changes described in the patch file to your current branch. You might encounter conflicts during the apply process, which you'll need to resolve manually.
Patches are particularly useful when you need to share changes with someone who doesn't have direct access to your Git repository or when you want to apply changes in a controlled manner. They're also great for archiving changes or submitting contributions to projects that use a patch-based workflow. It is worth noting that it's generally more complex than simply cherry-picking but if you can't cherry pick (perhaps you can't push to the repository) it's a useful tool.

Git Branching And Merging A StepByStep Guide
FAQ
6. Your Burning Questions, Answered
Let's address some common questions that often pop up when dealing with commit retrieval.
Q: What if I get a conflict when cherry-picking or merging?
A: Conflicts are a normal part of Git workflow. When you encounter a conflict, Git will mark the conflicting areas in your files. You'll need to manually edit these files to resolve the conflicts. Once you've resolved all the conflicts, stage the changed files and commit the changes. Think of it as a puzzle; you just need to find the right pieces to fit together.
Q: Is it safe to cherry-pick a commit that has already been merged into another branch?
A: Yes, it's generally safe. Git is smart enough to detect if the changes introduced by the commit are already present in your branch. If they are, it will usually do nothing. However, it's always a good idea to double-check to make sure that the changes are indeed identical.
Q: How do I find the commit hash I want to cherry-pick?
A: The easiest way to find the commit hash is to use the `git log` command on the branch containing the commit. This will display a list of commits, each with its unique hash. You can also use Git GUI tools or web-based interfaces like GitHub or GitLab to browse the commit history and find the hash you need.